▪ 객체 단위 분석
• (흰색) 객체를 분할하여 특징을 분석
• 객체 위치 및 크기 정보, ROI 추출, 모양 분석 등
▪ 레이블링(Connected Component Labeling)
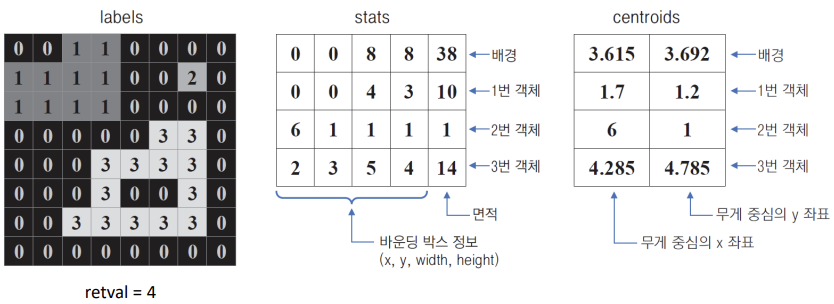
• 서로 연결되어 있는 객체 픽셀에 고유한 번호를 지정 (레이블맵)
• 영역 기반 모양 분석
• 레이블맵, 바운딩 박스, 픽셀 개수, 무게 중심 좌표를 반환
▪ 외곽선 검출(Contour Tracing)
• 각 객체의 외곽선 좌표를 모두 검출
• 외곽선 기반 모양 분석
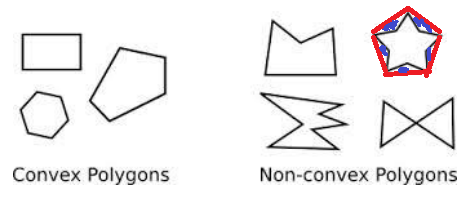
• 다양한 외곽선 처리 함수에서 활용 가능 (근사화, 컨벡스헐 등)
▪ 레이블링(Connected Component Labeling)
cv2.connectedComponents(image, labels=None, connectivity=None,
						ltype=None) -> retval, labels
_, src_bin = cv2.threshold(src, 0, 255, cv2.THRESH_OTSU)
# 레이블링된 객체의 크기와 어디에 있는지 정보가 필요할때 유용하게 쓰임
cnt, labels, stats, centroids = cv2.connectedComponentsWithStats(src_bin)
'''
cv2.connectedComponentsWithStats(image, labels=None, stats=None,
centroids=None, connectivity=None, ltype=None)
-> retval, labels, stats, centroids
retval: count(label 개수)
stats: 각 객체의 바운딩 박스, 픽셀 개수 정보를 담은 행렬 shape=(N, 5), dtype=numpy.int32
centroids: 각 객체의 무게 중심 위치 정보를 담은 행렬 shape=(N, 2), dtype=numpy.float64
'''
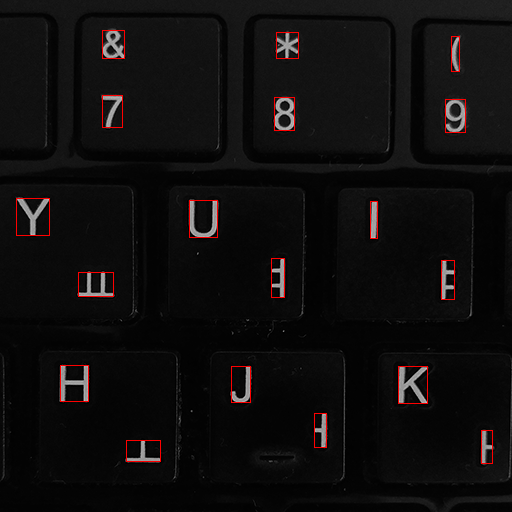
# bbox를 color로 보여주기위함
dst = cv2.cvtColor(src, cv2.COLOR_GRAY2BGR)
for i in range(1, cnt):
(x,y,w,h,area) = stats[i]
print(stats[i])
# 작은 noise가 검출되니 a 값이 작은 것들은 빼주겠다.
# threshold를 open함수를 통해서 침식 팽창을 해도됨
if area < 20:
continue
cv2.rectangle(dst, (x,y,w,h), (0,0,255))


▪ 외곽선 검출(Contour Tracing)
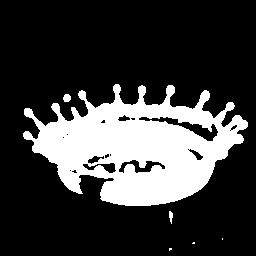
ret, src_bin = cv2.threshold(src, 0, 255, cv2.THRESH_OTSU)

contours, hier = cv2.findContours(src_bin, cv2.RETR_LIST, cv2.CHAIN_APPROX_NONE)
'''
cv2.findContours(image, mode, method, contours=None, hierarchy=None,
				offset=None) -> contours, hierarchy

mode: 외곽선 검출 모드. cv2.RETR_로 시작하는 상수.
method: 외곽선 근사화 방법. cv2.CHAIN_APPROX_로 시작하는 상수.

contours: 검출된 외곽선 좌표. numpy.ndarray로 구성된 리스트.
len(contours)=전체 외곽선 개수(N).
contours[i].shape=(K, 1, 2). contours[i].dtype=numpy.int32.

hierarchy: 외곽선 계층 정보. numpy.ndarray. shape=(1, N, 4). dtype=numpy.int32.
hierarchy[0, i, 0] ~ hierarchy[0, i, 3]이 순서대로 next, prev, child, parent
외곽선 인덱스를 가리킴. 해당 외곽선이 없으면 -1
'''
h, w = src.shape[:2]

# 검은 화면의 color 이미지 생성
dst = np.zeros((h,w,3), np.uint8)

# 단지 객체 파악 하기 위함
for i in range(len(contours)):
    c = (random.randint(0, 255), random.randint(0, 255), random.randint(0, 255))
    cv2.drawContours(dst, contours, i, c, 1, cv2.LINE_AA)
    '''
    cv2.drawContours(image, contours, contourIdx, color, thickness=None,
                  lineType=None, hierarchy=None, maxLevel=None, offset=None)
                  -> image

    contours: (cv2.findContours() 함수로 구한) 외곽선 좌표 정보
    contourIdx: 외곽선 인덱스. 음수(-1)를 지정하면 모든 외곽선을 그린다.
    maxLevel: 그리기를 수행할 최대 외곽선 레벨. maxLevel = 0 이면 contourIdx로
			  지정된 외곽선만 그린다.
    '''


* method

src = cv2.imread('ch07\\images\\contours.bmp', cv2.IMREAD_GRAYSCALE)

if src is None:
    print('Image load failed!')
    sys.exit()

contours, hier = cv2.findContours(src, cv2.RETR_CCOMP, cv2.CHAIN_APPROX_NONE)
'''
cv2.findContours(image, mode, method, contours=None, hierarchy=None,
                offset=None) -> contours, hierarchy

mode = cv2.RETR_EXTERNAL(바깥 외곽선만 검출)
contours = shape=(k,1,2), len(contours)=전체 외곽선 개수(N)
hierarchy = shape=(1,N,4) hierarchy[0, i, 0] ~ hierarchy[0, i, 3]
          = next, prev, child, parent
'''
# bbox 색으로 보여주기위함
dst = cv2.cvtColor(src, cv2.COLOR_GRAY2BGR)

# 내부 구조를 개별적으로 파악하기 위함
idx = 0
while idx >=0:
    # color 각각의 색 random
    c = (random.randint(0, 255), random.randint(0, 255), random.randint(0, 255))

    # 외곽에 있는 것만 그림
    # idx = 특정 윤관석만 그리고 싶다면 정수로 지정
    cv2.drawContours(dst, contours, idx, c, 2, cv2.LINE_8)
    # 다 그림(mode = cv2.RETR_LIST의 경우는 설정 안해도 다 그림)
    # cv2.drawContours(dst, contours, idx, c, 2, cv2.LINE_AA, hier)

    # idx 업데이트 next
    idx = hier[0, idx, 0]


다양한 외곽선 처리 함수에서 활용


#외곽선 길이 구하기
cv2.arcLength(curve, closed) -> retval
'''
• curve: 외곽선 좌표. numpy.ndarray. shape=(K, 1, 2)
• closed: True이면 폐곡선으로 간주
• retval: 외곽선 길이
'''

# 면적 구하기
cv2.contourArea(contour, oriented=None) -> retval
'''
• contour: 외곽선 좌표. numpy.ndarray. shape=(K, 1, 2)
• oriented: True이면 외곽선 진행 방향에 따라 부호 있는 면적을 반환.
			기본값은 False.
• retval: 외곽선으로 구성된 영역의 면적
'''

#바운딩 박스(외곽선을 외접하여 둘러싸는 가장 작은 사각형) 구하기
cv2.boundingRect(array) -> retval
'''
• array: 외곽선 좌표. numpy.ndarray. shape=(K, 1, 2)
• retval: 사각형 정보. (x, y, w, h) 튜플.
'''

#바운딩 서클(외곽선을 외접하여 둘러싸는 가장 작은 원) 구하기
cv2.minEnclosingCircle(points) -> center, radius
'''
• points: 외곽선 좌표. numpy.ndarray. shape=(K, 1, 2)
• center: 바운딩 서클 중심 좌표. (x, y) 튜플.
• radius: 바운딩 서클 반지름. 실수
'''
cv2.approxPolyDP 더글라스-포이커 알고리즘
def setLabel(img, pts, label):
    (x, y, w, h) = cv2.boundingRect(pts)
    pt1 = (x,y)
    pt2 = (x + w, y + h)
    cv2.rectangle(img, pt1, pt2, (0,0,255), 1)
    cv2.putText(img, label, pt1, cv2.FONT_HERSHEY_SIMPLEX, 1, (0,0,255))

gray = cv2.cvtColor(src, cv2.COLOR_BGR2GRAY)
# 도형색이 배경보다 높기 때문에 INV 진행
_, src_bin = cv2.threshold(gray, 0, 255, cv2.THRESH_BINARY_INV | cv2.THRESH_OTSU)
contours, _ = cv2.findContours(src_bin, cv2.RETR_EXTERNAL, cv2.CHAIN_APPROX_NONE)

for pts in contours:
    # 너무 면적이 작은값(noise)? 제거
    if cv2.contourArea(pts) < 1000:
        continue
    # print(pts) 각 좌표값

    # 근사화
    approx = cv2.approxPolyDP(pts, cv2.arcLength(pts, True)*0.02, True)
    '''
    cv2.approxPolyDP(curve, epsilon, closed, approxCurve=None) -> approxCurve

    curve: 입력 곡선 좌표. numpy.ndarray. shape=(K, 1, 2)
    epsilon: 근사화 정밀도 조절. 입력 곡선과 근사화 곡선 간의 최대 거리.
      			e.g) cv2.arcLength(curve) * 0.02
    closed: True를 전달하면 폐곡선으로 인식
    approxCurve: 근사화된 곡선 좌표. numpy.ndarray. shape=(K', 1, 2)
    '''

    # 각 모서리 개수
    vtc = len(approx)

    # 삼각형, 사각형
    if vtc == 3:
        setLabel(src, pts, 'TRI')
    elif vtc == 4:
        setLabel(src, pts, 'RECT')

    # 정해진 외곽선 길이에 대한 넓이 비율이 가장 큰 형태가 원
    else:
        length = cv2.arcLength(pts, True)
        area = cv2.contourArea(pts)
        ratio = 4. * math.pi * area / (length**2)

    # 1에 가까울수록 원으로 판단
        if ratio > 0.85:
            setLabel(src, pts, 'CIR')
원 판별하기
- 정해진 외곽선 길이에 대한 넓이 비율이 가장 큰 형태가 원


'OpenCV > OpenCV-Chapter' 카테고리의 다른 글
| CH08 OpenCV-Python Moment 기반 객체 검출 (0) | 2021.12.24 |
|---|---|
| CH08 OpenCV-Python 영상 분할 그랩컷(GrabCut) (0) | 2021.12.24 |
| CH07 OpenCV-Python 이진화(Binarization) (0) | 2021.12.24 |
| CH06 Opencv-Python Hough Transform(직선, 원) (0) | 2021.12.19 |
| CH06 Opencv-Python 영상의 특징추출(Gradient) (0) | 2021.12.19 |


댓글